The Blog
Search
Search
Exhibit
Fresh Photos
Editor's Choice Photos
Photoblogs
Upgrade
PRICING
Login
Start
Your 14-Day Free
Trial
Where you store your photos is as important as the photos you take.
Start Trial Now!
»
Wyoming Division HO Operation Layout
Wyoming Division HO Operation Layout
25 How We Operate-Fall 2022
By Verryl V Fosnight Jr
;
Nov 25, 2022
35 Photos
Share Album
Justified View
Flow View
Square View
Grid View
Journal View
Highlight View
Large Photo View
Slideshow
Proofing View
TV View
RSS
Verryl V Fosnight Jr
Featured
Gallery
About
Contact
Menu
Wyoming Division HO Operation Layout
Wyoming Division HO Operation Layout
25 How We Operate-Fall 2022
Nov 25, 2022
35 Photos
Share Album
Justified View
Flow View
Square View
Grid View
Journal View
Highlight View
Large Photo View
Slideshow
Proofing View
TV View
RSS
Featured
Gallery
About
Contact
Menu
×
Verryl V Fosnight Jr's Gallery
Wyoming Division HO Operation Layout
25 How We Operate-Fall 2022
https://verrylvfosnightjr.slickpic.com/albums/25-How-We-Operate-Fall-2022/photo/#19447892
Album 25 Lead
I have made operations on the Wyoming Division very easy, because I am NOT an experienced operator, and from what I have seen trying to participate in such sessions as TT&TO and those rule book heavy sessions, I don't want to. I want to run trains and see others run trains, and work constructively together, not argumentatively frustrating others. I want to have relaxing fun and see that my guests also enjoy every expensive (in time and money) moment. It seems t me that with those type of sessions 2 or 3 guys are having a whale of a time "teaching" each other the finer points in the rule book for excruciating periods of time while the rest of us stand and fidget and watch. I did not drive 600 miles and budget $500 for this. I am glad they are having fun, but I am P.Oed. Let them have private Rule Book sessions among themselves. Don't screw up my trip.
https://verrylvfosnightjr.slickpic.com/albums/25-How-We-Operate-Fall-2022/photo/#19426235
P1001437 Wam from SE TD1 Exp 0.83 SC25 CROP
These photos are largely the same scenes as Album 24, but from slightly different angles that show other details in the scene. This is Wamsutter. Wyoming. Just west of the eastern end of out Harriman Siding (the siding in between the two mains), is the depot, which, along with the team track on the gravel road, is cut out of this view to the left. Desolate town,isn't it? Well, that is Wamsutter for real!! Each yard or even sidings that serve businesses, like here in Wamsutter, has a dedicated switch engine, even if there is no yardmaster working there. These are for the use of the road crews (engineers only, unless a first time operator wants the support of an old hand to help him for a while). These road crews may be for a "Manifest," a "Local," or an "Extra," or "Drag," train in declining superiority. This way the road engineer can double as the yard engineer and work each locomotive in turn to do his setouts and pickups along the way. Today Wamsutter has a diesel, but often a Consolidation steamer is used.
https://verrylvfosnightjr.slickpic.com/albums/25-How-We-Operate-Fall-2022/photo/#19426293
P1001532 Dupof 1525
Here is an exposure that need work. Note how I carefully removed the car cards from the fascia slots and carefully laid them on the floor in the correct order--then I photographed them there, not realizing they would look like trash scattered around!!! I caught Sharon in the photo, but it was badly lighted. Note that there is no dark band due to the fluorescent fixtures, I guess because there are many more fixtures and they are on different circuits, so they tend to be out of phase with each other, so no dark band.
https://verrylvfosnightjr.slickpic.com/albums/25-How-We-Operate-Fall-2022/photo/#19426278
P1001525 CROP TD1 same per Sheet
This is better. Using a post processing program, I adjusted the overall exposure to brighten it generally, and then used a Gradient tool to light the right hand edge gradually across it. The gradient tool allows me to set the location, angle, width, and density, so that the correction is gradual so as to not leave a sharp change in brightness, i.e., no sharp,bright edge. Then I "picked up" the trash on the plywood sub floor with the Clone & Stamp tool, which clones an area (copies it and then stamps (copies it) to another area (over the car cards/trash). You can select the diameter of the C & S tool, and how transparent it is, from hazy to full coverage, and how "soft" the edges of the stamp are--usually you would want the stamp to have faint, feathery edges, so it looks natural. The wall phone is one of 16 around the layout to call the Dispatcher to report his train's position (to ""OS"). The blue 3 ring binder holds a 7 page list of spots where cars may be left to load or unload. A page of it is shown in the next picture.
https://verrylvfosnightjr.slickpic.com/albums/25-How-We-Operate-Fall-2022/photo/#19447603
Spots Single Page jpg
ANYONE can mark a car card to cause it to move, if in his opinion that car should be moved. i.e., ALL OPERATORS are also UP AGENTS; they can help decongest a yard or spot by this action. This layout need never get clogged up, because all operators can keep the cars moving. Cars thus tend to move randomly* because random "agents" move them. *Naturally a NYC MT car should not be sent to Portland; it should head home to avoid demurrage. This is page 3 of the 7 page color coded list of spots (locations where a car may be left to load or unload) on the railroad. The towns are listed on the left in BOLD print. Under each town is a list of the locations that UP serves in that town. They are numbered as independent industries or UP spots. the next column is a list of the spots by name. Then there is a set of color coded columns, one for each type of car. If the spot should not accept that type of car, the space is blacked out. For example, for UP #9, the coal Track and the Sand Track can only use gondolas or hoppers. It would be silly to send a flat car of sand there. Those spots can take a combination of up to 6 and 4 Gondolas or Hoppers.
https://verrylvfosnightjr.slickpic.com/albums/25-How-We-Operate-Fall-2022/photo/#19426259
P1001521 lookTD1 per sheet
This is Medicine Bow on the right with The Virginian hotel and depot on the right. Laramie is on the bench to the left and in the distance is the west half of the Cheyenne Steam Yard on the 84" wide bench across the building. The Cheyenne buildings just beyond the Laramie roundhouse in the upper right corner are about 65 feet from the camera. To see more detail, you can hold the cursor over the image, and it will turn into a "+" sign. Click the image,and the image enlarges, as the cursor turns into a flat hand. If you click it, the flat hand turns into a fist with with you can grab the image with the mouse to push or pull it around to move the hidden parts into view. Click again and the image returns into full view.
https://verrylvfosnightjr.slickpic.com/albums/25-How-We-Operate-Fall-2022/photo/#19426227
P1001428 W Sh Hill Lar Hanna TD1 CROP
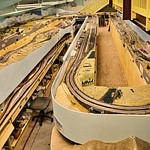
This is a reprise of an overall view of about 1/2 of the layout, counting the 2 lower levels, both of which can be seen here. This photo was taken while standing near the top of the west stairway. The 2 Lower Levels of the bench work can be seen here in the aisle just over the stool. Between the upper level and the stool are glimpses of the two lower levels. The "lower level" shows as a black winding line; the lowest level is straight and goes to Park City. The winding track are going into Utah. That track goes though Tunnels 4, 5, 6, and 7 plus the daylighted tunnel near Castlerock. Tunnel number 1 is the twin Hermosa tunnels bored 30 or so years apart They are called "#l." We have all 10 of UP's Wyoming Division tunnels, and their data are shown on the next image/table. Tunnels #8, and #9 (twin tunnels), and the single #10 are on the next bench to the left facing the left hand wall. Recall that the very wide upper level bench along that wall extends to the wall, but it is suspended over the aisle below it. This was to allow the Harriman Cutoff (Track #3) up the east slope of Sherman Hill to be separated far from #1 and #2.
https://verrylvfosnightjr.slickpic.com/albums/25-How-We-Operate-Fall-2022/photo/#19443459
UP Tunnels Data
TUNNELS ON THE UP WYOMING DIVISION Data per Don Strack (see his "Utah Rails" website) We have managed to model all 10 of the tunnels on the real Wyoming Division. Tunnel #1 is the twin tunnels drilled about 30 years apart. This time gap between the two is possibly the reason they are numbered together as #1. Otherwise all the others would have to be renumbered to keep the numbers in east to west order. Our Aspen and Altamont tunnels, #2 and #3, respectively, are about 11 and 13 feet long. Our minimum major yard track length is 17 feet, and trains are limited to about 16 feet. Our model Tunnels #2 and #3 on the layout curve 180 degrees under the lower level end cap of Benches between aisles #3 and #5 on the lower level Just in front of the front doors on the lower level track plan. See the track plans for the three levels on the parent SlickPic album "Wyoming Division HO Operation Layout." This chart is not at all crucial to operations, but I thought it might be interesting that this layout is big enough to not leave out anything as important as a tunnel. The layout does cover about 5.6 miles of UP track.
https://verrylvfosnightjr.slickpic.com/albums/25-How-We-Operate-Fall-2022/photo/#19426287
P1001529 ROTATE TD1 per Sht
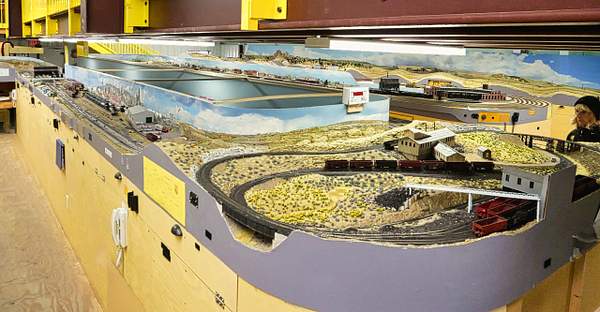
Back to Rawlins on this tour. This shows nearly all of Rawlins. Coming into Rawlins from the Red Desert on the right, the alternate main through Rawlins starts with a turnout off Track #2, the east bound main. All of the yards have alternate mains through them to facilitate switching cars onto or off trains that stop to deliver or set out cars at that yard. The alternate main can be parked on by a train temporarily to pick up or set out cars, and this leaves both mains, Tracks #1 and #2 clear for passing traffic. Wamsutter does not have a yard, and it has no alternate main, but the center siding with the east entrance to it serves as a place for a working train to duck onto to clear either main. Or at Wamsutter the train to drop off or pick up cars can park on the center siding, and the switch engine there can pull cars from it or take cars to it on the siding. More of the Cheyenne steam yard is in the distance, and it can be seen by enlarging the view as described in a previous photo.
https://verrylvfosnightjr.slickpic.com/albums/25-How-We-Operate-Fall-2022/photo/#19426289
P1001529 ROTATE Crop TD1 per sht
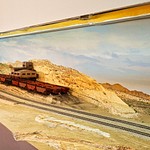
This is the same Rawlins and Red Desert photo with much of the overhead building structure cropped off. The former full photo gives a feel for the layout in the 50 x 75 foot building, and it gives an idea of what can be seen from the hanging mezzanine. This picture emphasizes the distinct parts and details of the layout on the two nearby benches and on the distant Cheyenne steam yard/Speer wye bench. Here the same car cards that I dropped on the floor in order have been replaced into their fascia slots. To read about my unique 4 card car forwarding system, the article "Operations on the Wyoming Division" is in the Wyoming Division Historical Society website at http://www.wyomingdivision.org/ That article was originally published in "Dispatcher’s Office," the National Model Railroad Association’ Operations special interest group quarterly magazine.
https://verrylvfosnightjr.slickpic.com/albums/25-How-We-Operate-Fall-2022/photo/#19426248
P1001440 Rawlins TD1 CROP
This is another photo of most of Rawlins thrown in for continuity so you can keep an idea where the camera is pointing. I have cropped it to concentrate on the model. Since I built/am building it for operations, I tend to photograph wide angle views of large swaths of the layout, exactly because my emphasis in model railroading is operating and sharing the operations with other operators. Since I don't drink anymore, this is how I party. This is not to say that I do not appreciate Allen and Lenny's exacting and fantastic skills at modeling. And I have had extreme good luck in stumbling on them as partners in building the Wyoming Division. I am not a good modeler, and with Parkinson's as my contribution to the covid pandemic, I have given up trying. I am proud of my contributions of the concept, the design work with AutoSketch and the track planning software, "3rd F***ingPlanit, I mean "3rd Planit," and of course the financing of the whole deal. Oh yes, and of course, I like to give parties.
https://verrylvfosnightjr.slickpic.com/albums/25-How-We-Operate-Fall-2022/photo/#19426253
P1001516 TD1 per sheet
This photo, taken from about 2/3 the way up the east stairs to the Mezzanine, shows Laramie on the right, and up the western slope of "The Hill," the Hermosa Tunnels , Dale Junction where the Harriman Cutoff (Track #3) connects to #1 and #2, then the two routes on the east slope of Sherman Hill. Try the enlarged image feature on both the distant areas of The Hill and Cheyenne on the left and on the extreme lower left corner, which shows a small part of one of the two third (lowest) levels. This one runs from Echo, Utah on the second level down to Park City about where the rolling 3 step-ladder is in the aisle. There are no structures or scenery on either of the third levels. Park City consists of a two track "yard," both tracks of which terminate in a 12" manual turntable that is used to turn the loco on trips to deliver and return a string of cars to Ogden via Echo, Utah. This photo shows a tiny bit of the end of the aisle covering bench just to the left of Dale Junction . The top bench was extended to the wall widen the upper level bench to make the Harriman Cutoff realistic. The very small front part of this "lid" is on the extreme left. It is painted baby blue, and is connected to the large fascia that curves out of sight around towards it.
https://verrylvfosnightjr.slickpic.com/albums/25-How-We-Operate-Fall-2022/photo/#19426274
P1001523 TD1 per sht
This is taken from the east stairs up to the yellow railed mezzanine that spans the 75 ft length of the building. It is 7 feet wide and is suspended from two massive girder arches. There are straight sections of the arches at the walls, and the two on the right hand side can be seen where the right hand bench backdrop with sky and clouds bulges out from the walls around them. They are bolted to the sloped roof arch members, and these two members make up one half of each arch. At the peak of the arches, and of the roof, they are bolted to the other half that runs down the other half of the building. Part of the joint at the near peak can be seen at the extreme upper left corner of this picture. There are two arches. On each side of each arch, 25 feet from each building side wall, a vertical beam is bolted to the bottom of the arches and hangs down to support the I beam mezzanine floor joists that run the 75 foot length of the building and mezzanine. The 4 vertical beams and the floor joists are coated with rust inhibiting brown paint. All that is my long winded way of saying there are no posts out on the floor of the building.
https://verrylvfosnightjr.slickpic.com/albums/25-How-We-Operate-Fall-2022/photo/#19426261
P1001523 TD1 per sheet crop
This expansive view is cropped from the last photo. It shows the first 4 benches going across the building. A train on the left traveling on the inner pair of tracks (above the clipboard "Velcroed" to the front of the bench)--those two tracks which pass out of sight behind the Hanna coal mine area on the end cap to the benches, that train would enter Rawlins on the next bench out of sight. Beyond these 4 benches before the camera are 4 more benches parallel to these 4 counting on to the left. The ninth bench, immediately in front of the camera, extends to the left out of view. It lays perpendicular to the 8, the 4 plus 4. The 9th bench is the 84 inch wide Cheyenne yard bench that here cuts the inner corner to the lower right toward the Sherman Hill bench. The Speer, WY wye can be seen nestled into the ground cover, and the 5 industries in the foreground comprise those in west Cheyenne. In other words, I am boasting at how large the layout is--only 1/4 of the bench tops can be seen here, or 1/2 if you imagine the lover level is visible below these. The mains #1 and #2 are about 1,005 feet long including the 30 feet or so in staging. That staging portion connects the sceniced portion of the layout into a circle (although we never run in a circle--it is just that staging can be entered from either end).
https://verrylvfosnightjr.slickpic.com/albums/25-How-We-Operate-Fall-2022/photo/#19426290
P1001527 TD1 per sheet
From nearly the top of the mezzanine steps. The bench in the middle is the west slope of Sherman Hill, and the eastern slope (to Cheyenne is against the wall. This picture was taken before Lenny's Laramie depot was finished and set in place on its cork flooring covered space against the backdrop at the bottom center. All the yards, Cheyenne, Laramie, Green River, and Ogden, is covered with 1/4" cork flooring underlayment. Likewise, all the the spline roadbeds also have the 1/4" cork under the tracks. One of the four antennae for the DCC command station hangs from the A/C duct on the upper left. We painted the ceiling sky blue, although it has a green tint here. One of the vertical and roof angle mezzanine beams clearly stands out here, as does the fire sprinkler system.
https://verrylvfosnightjr.slickpic.com/albums/25-How-We-Operate-Fall-2022/photo/#19426277
P1001527 CROP per sheet
The former picture cropped to minimize the building parts.
https://verrylvfosnightjr.slickpic.com/albums/25-How-We-Operate-Fall-2022/photo/#19426303
P1001531 TD1 per sheet
This is the cut on the west end of Rawlins, showing the carved and stained plaster and scenery. The car cards, seen stacked in the plexiglass card slots, are 1/4 sheet of card stock. We also use 1/2 sheet block cards, that identify the first and last cars in a block by railroad, car number, type, and color, and the total number of cars in the block. Block cards are handy for quickly making up a train with a few or many identical type cars that all carry the same commodity. Whenever we operate it is harvest time and we run long stings of up to 30 cars plus a caboose pulled by Big Boys, or Turbines or consists of diesel power. Smaller locomotives have lower tonnage ratings expressed as the maximum number of cars allowed on their trains. Loco cards are laminated, because they don't change. They are the third type of card in my Four Card System. The 4th card is a Train Sheet which tells where the train is to go, and what priority of class it is, and most important what type train it is . The train types are ordered in priority or superiority. From high to low they are shown on the next graphic image.
https://verrylvfosnightjr.slickpic.com/albums/25-How-We-Operate-Fall-2022/photo/#19447672
Nomenclature in JPG
This is the Nomenclature sheet we use to govern operations as to train types and train superiority. Every train has a coded train name of "From-To-Type-Direction" as explained in the top block. An example is "Green River to Cheyenne-Local- East. This train is a "turn," that is it goes to the "To" location, turns and returns to the "From.' On its way back it is named: "Cheyenne to Green River-Local West." The Type of train also designates its Superiority, from "Special" (Highest) down to one of the interchangeable lowest types. The simplified schematic map of the layout shows the commonly used off-the-layout locations, which are those outside the rectangle which represents all of the layout except staging, which is to say the two staging yards (Main Staging and Portland on the third level). Memory aids for locations: Anything North of Green River is "Portland. Anything west of Ogden is either "Oakland" or "LA." And any place east of Cheyenne is North Platte, Nebraska (e.g., Chicago and St. Louis). And anyplace south of Cheyenne is Denver.
https://verrylvfosnightjr.slickpic.com/albums/25-How-We-Operate-Fall-2022/photo/#19470814
Ops Summary for SlickPic Album 25
It seems to me that many formal model railroad operating sessions are organized to mimic prototype operations of days long gone before computers and modern communications that had to use archaic paperwork without signals. To the prototype operator the knowledge of the "Rule Book" and of its accurate interpretation were all importance for efficient running and for safety--accidents were life threatening for sure! This excessive reliance on that paperwork that model RRs have, not for safety, but for the holy grail of "prototypical" ops seems misplaced to me. For me, running trains and seeing them run through realistic scenery takes a distant second to knowledge of, and application of, the Rule Book. When I used to go to meets to operate, it seemed to me that way too many times, the operations stalled for long times while 3 or 4 knowledgeable operators got together to argue a certain situation and how to manage it and solve it according to the Rule Book. Meanwhile the rest of us, who had flown and rented a car and paid for food and lodging for 3 or 4 days, were left to just stand around like poor relatives. The supreme goal of my Wyoming Division is to be a good host who provides an opportunity to run trains in a fairly prototypical way. Who cares what those obscure rules are? Or,for that matter, what does it matter what is in each car? Do we need a tiny waybill, which only the conductor and office workers saw anyway? Unless it is haz mat in miniature it would seem.
https://verrylvfosnightjr.slickpic.com/albums/25-How-We-Operate-Fall-2022/photo/#19448169
Car Card and Block CArd JPG
This is a car card (1/4 sheet on card stock) and a Block Card, (1/2 sheet of card stock). The Car Card is good for 15 moves. If you need to clear some space at a spot, just add a next move Using the 3 ring "Spots on the Wyoming Division" binder at the closest yard to pick a destination when the current move is completed. Use pencil, not ink. This makes every operator into a part time Freight Agent! It also makes sure that operations do not get shut down by a overcrowded yard. This car card becomes an LCL card just by checking the "Full," "LCL," "Unloaded" or "Loaded" boxes, and writing in the next station up the line in the "To" box. Just keep LCL cars and cards going the same direction until they get to staging! For the Block Card, if the "To" and "From's" are circled, you can erase them and circle another logical destination. write in a new destination following the previous one in the "Special Instructions" blank. Use the "Spots" binder to find a reasonable destination. A block and its card moves the same as as single car with its car card. This newfound power to cause car moves utilizes an age old and cherished railroading principle: "Move those cars down the line and make them someone else's problem."
https://verrylvfosnightjr.slickpic.com/albums/25-How-We-Operate-Fall-2022/photo/#19448170
Loco Card for Training Doc4004 - Copy
This is a Locomotive card for Big Boy 4004. Each steam and diesel loco on the layout have cards that fit their pulling power, the "Tonnage Rating" on the right hand side, middle of the card in units of number of cars, not including the caboose. Big boys are rated at 30 cars, and other lighter locos have a lower rating. The cards are printed on full sheets of colored paper, the color being unique to the loco type and class. Big Boy sheets are red. All sheets are laminated in plastic since they are never written on or changed, and the color makes them easier to find when a train is first made up for that loco class. The array of spaces is like a timetable. For a trip east to west the engineer should read down to see what stops must be made to serve the loco--to take on fuel, water, sand, or to dump ashes. For a west to east trip the chart is read from the bottom up. At the bottom is a list of throttle/loco functions (sound effects) and how to turn them on and off.
https://verrylvfosnightjr.slickpic.com/albums/25-How-We-Operate-Fall-2022/photo/#19448171
Train Order INSTRUCTS TRAINING
This is one of many Train Sheets that give complete instructions on how what a train crew should should do on this particular. The top line is filled in by the staging yardmaster, and it identifies the train by its job designation by the 4 job name components, "Loco number, From, To, and Type/Priority of train." This is how the conductor should report this train to the Dispatcher. This Train Sheet is for a "Manifest" freight train train, which we define as a freight that has 5 cars on the head end that must be set out along the way as the car cards for them dictate. And the train should pick up and take with it a replacement car or cars from that location and forward them along the line. So those trains do a bit of switching at most locations, either by helping the resident YM or by the engineer alone using the switch engine stationed at each location. Each NCE throttle can be set to change between one of two locos, so he can in turn move the car or cars or the Manifest train as needed. The large test array at the bottom 3/4 of the TS lists the yards the train traverses, and a one line showing the work that may be required there. The right hand half of the array gives loco and work requirements in very brief form. This sheet is for a west bound Manifest. There is a east bound Manifest TS withe the stations in reverse order. Manifests that are meant to run over only part of the layout can use this same sheet, just by the operator ignoring the stations that are not passed.
https://verrylvfosnightjr.slickpic.com/albums/25-How-We-Operate-Fall-2022/photo/#19458751
Coal Order Form Rock Springs West
For the coal drag from Rock Sprints to Ogden the operator starts his shift as another coal agent. He takes the one blank order form on his clipboard, and walks from Rock Springs on the lower level and counts the empty (MT) coal hoppers at each of the coal distribution places. He fills in the MT's to be picked up and the matching number of loaded hoppers to deliver to replace them. Then he uses his throttle to run the Rock Springs switch engine to assemble the total number of loads to be delivered to those places, and adds the caboose to the end. then he returns the switch engine to its stub track, and couples the road engine diesel consist to the train. With Dispatcher (Ds) clearance to Green River, his first stop, and does his work at Green River with the permission of the YM there. When he is done, he asks Ds for clearance to Westvaco, does his work and continues all along his route in the same way. He then continues as a lowest class train all the way to Ogden working the stops along the way, and he keeps in touch with the Ds for each move. He continues all along his route to Ogden. Then he returns to Rock Springs where he is done, and free to get another train from the Staging YM. Hint: if there is a free track at Echo, he can park some of his MTs in the Echo Yard, and pick them up on the way back from Ogden and on to Rock Springs.
https://verrylvfosnightjr.slickpic.com/albums/25-How-We-Operate-Fall-2022/photo/#19462264
Signs on the Fascia CROPPED
We have posed many signs on the fascia to help operators 1. know where their train is 2. see where it should go to get to its next destination 3. Where to call the Dispatcher (Ds) and what to tell him. 9Remember you identify your train to him by reporting the 4 things on the top of your TS (Train Sheet) by saying, "This is [Loco number] [train name/type] [From] [To] and [at] (stating your current location. 4. there are track maps of all yards or locations where you might be looking for a car to pull or a spot to leave a car. 5. Yard Limit signs show the boundaries of the YM's authority over you and your train. 6. All of the layout is double tracked except for the Harriman Cutoff , which is bidirectional with a single length of double track for meets., and the OSL which is an 186 foot long track with two sidings. The OSL is hidden track but visible on its straights on the edges of the benches. 7. The current of running changes to left hand running between Dale Junction and Laramie and between the Curvo overpass and Ogden. Engineers watching for fascia signs will see this change noted by a tan colored fascia sign that schematically shows this. 8. Each yard has a brief note of yard instructions on blue paper i a sheet protector. 9. Each yard has a skinny 3 ring 8 1/2 x 11 binder with the list of spots, in case the YM to the engineer needs to pick a spot to send a car forward on his own.
https://verrylvfosnightjr.slickpic.com/albums/25-How-We-Operate-Fall-2022/photo/#19465119
Current of Running for Wyo DivWITH Yard LimitGR 2LEFT RUNNING
This is a schematic of Tracks #1, #2, and #3/ It shows 1. Where the current running changes from conventional right hand to left hand. EAST TO WEST: At Cheyenne west bound trains must take #1 (RH) up the Hill. At Dale they must take one of two crossovers to change to left hand running down the Hill. At Curvo the west bound track #1 goes over #2 at the Curvo overpass and continues left hand running into Ogden. WEST TO EAST: Trains leave Ogden eastbound on Track #2 until Curvo. They return to right hand running automatically by passing under Track #1 at the Curvo Underpass. At Dale east bound trains must set one of the two remote turnouts to revert to right hand running either down the Hill into Cheyenne, or down the Hill to either Cheyenne or Denver via the Harriman Cutoff. WEST TO EAST: This is the name naturally, and engineers must be alert to take the correct route at the above 3 locations. WITHIN LARAMIE OR OGDEN: The left to right or R to L is chosen by turnouts and almost solely by the YM there, for he directs the incoming or outgoing trains within his yard. Engineers must make the final moves as they leave to continue on the correct track.
https://verrylvfosnightjr.slickpic.com/albums/25-How-We-Operate-Fall-2022/photo/#19461968
OS Instruction Card
Instructions on how to call the Dispatcher and how to report so he can get the progress of a train in his Train Sheet.
https://verrylvfosnightjr.slickpic.com/albums/25-How-We-Operate-Fall-2022/photo/#19465120
OS TRIANGLES 6
A Sheet of Yard Limit signs that are posted on the fascia right at the Limit near the mains as they enter the yard.
https://verrylvfosnightjr.slickpic.com/albums/25-How-We-Operate-Fall-2022/photo/#19461970
Cheyenne Fascia Map 01
The Cheyenne Steam and Diesel yard is 84" (7 ft) wide, so except for the throws visible on the near tracks we use Tortoise electric switch machines. To aid me--everyone else seemed to be able to work this yard without the numbers--I planted 3/16" square plastic posts near the points of the Tortoise turnouts, and I numbered the posts and turnouts on the very large yard map. This would have been a better photo if I had captured a few more of the yellow switch panels/maps at the bench edge. So see the next photo.
https://verrylvfosnightjr.slickpic.com/albums/25-How-We-Operate-Fall-2022/photo/#19465121
P1063634 Paul
There are about 11 of these switch panels to operate the Tortoise turnout machines. (I try to follow the adage that a turnout is a railroad track element, and a switch is an electrical device.) they have rocker electrical switches mounted nearly horizontally behind the 1" diameter holes, so other is no chance of accidentally bumping one and throwing a turnout unknowingly. They are hinged at the bottom so they can be swung down for maintenance. At the far left about 1/3 the way from the bottom, 2 white numbered posts can be seen. Lenny Wyatt made all of the Tortoise switch panels. (A "switch panel" in my usage, is a panel of electrical switches that controls a related batch of track turnouts.) The Ogden end of the main staging yard is visible in the distance on the lower level. The adjunct staging is on the same level below the electrical switch panels.
https://verrylvfosnightjr.slickpic.com/albums/25-How-We-Operate-Fall-2022/photo/#19470315
Laramie Flipped FULL JOINED HALVESscreen shot to rid line
This is the fascia map of Laramie, lifted from the original track plan. It is printed on yellow card stock and is about 27 inches wide. It is mounted on a hinged board on the front of the bench, so it can be tipped up to be read easily. It is covered with a clear sheet plastic to protect it. There are similarly generated yard track plans for all yards or places with multiple spots, so operators can find the spots they are to set out cars on.
https://verrylvfosnightjr.slickpic.com/albums/25-How-We-Operate-Fall-2022/photo/#19462023
Downtown Ogden Industrial copy5_5 in tall
This is the track plan of Downtown Ogden, Utah. From the upper level floor you step down two step into a large "hole" in the layout that this 5 ft by 8 ft model of Downtown Ogden, which is SP territory. The SP operator asks the UP Ogden YM for some cars, and he brings 6 or 8 cars into his small yard, after leaving some he has earlier pulled from the 11 businesses. He takes them back and spots them at his spots as shown on the car cards that came with the cars. It is kind of a switching puzzle, because you can't run around cars anywhere except in the small 3 track + one track for running around cars. So you have to pull cars from nearly all the spots, and pull them all the way to the yard, then "escape" the yard back to Downtown. The reverse is true for most of Downtown; you have to push most cars to their spots. A devilish modification to the job would be to number the doors on the multi-door businesses A - K, so a lot of cars would have to be moved onto spots on the other side of existing cars on already on spots.
https://verrylvfosnightjr.slickpic.com/albums/25-How-We-Operate-Fall-2022/photo/#19470324
22 Descriptive Photos 50
This is Linda, "Queen of Downtown Ogden," who used to operate every monthly session in the downtown Ogden "hole." The track plan for downtown Ogden showing its 14 sets of spots was shown on the previous slide. The bench height for downtown Ogden is the same as for the other lower level benches. This is also a good shot of Wycon Chemical just a few miles southwest of Cheyenne. Its tracks are not accessible to be reached by hand, but from the hole I can see the car numbers to forward them for the next session by adding a new destination to their car cards . I carry a miniature telescope in my operation "nail" apron to read car numbers further away than a few feet, like some of these. It is easier to pull out my tiny scope (see next image) than to step up the two steps onto the upper level deck. That entrance is directly behind Linda. If I ever work Downtown Ogden again, I would use my little scope at times rather than stepping up onto the upper deck to find cars-the car card racks are inside the "hole."
https://verrylvfosnightjr.slickpic.com/albums/25-How-We-Operate-Fall-2022/photo/#19470325
Carson 6x18 Scope
This is the tiny scope I use when operating or remarking car cards before an operating session. It is less than 1 inch in diameter and about 2 to 4 inches long depending on what distance it is focused on. It is useful at Downtown Ogden, Ogden (on the lower level--Bench width just over 4 feet), Ideal Cement in Echo (8 cars on spots plus 2 or 3 at the bagging warehouse--readable only from the upper level, which requires a walk around 3/4 of the layout up on the upper level), and Cheyenne for cars out on the center of that 84" wide bench. It's a big layout!
https://verrylvfosnightjr.slickpic.com/albums/25-How-We-Operate-Fall-2022/photo/#19462033
Echo and Echo Flipped on one sheet
The two fascia maps for Echo and Park City. Park City is on hidden track, the bottom track that leaves Echo on the bottom of the top map. That track leaves the right hand end of the Echo yard (Top Map), and descends down to the lowest level. The only work to be done in Park City is to pull a string of cars to Park City, leave them, and return with the cars that are waiting on the Park City yard for the return to Echo and beyond. "Beyond" is either Ogden or staging from the Ogden end (which is the off layout locations of San Francisco or LA from that end of staging). At Park City the arriving train leaves the cars it brought on the empty track. After uncoupling, the engine proceeds to the manual turntable which the engine is turned for the return to Echo. On the way out of Echo the operator runs around the waiting cars and backs to the end of those cars, and after coupling to them, he pulls forward then backs the short (5 or 6 cars) train back to the other track and retrieves the caboose he came with for the trip back to Echo. Once in Echo, those cars are sorted for further E or W destinations, either E towards Cheyenne, or west to Ogden and points west. The mirror reversed map on the bottom is on the fascia of the next aisle where the operator, now in Echo, is facing the other direction. See the two blue arrows labeled "Operator View.
https://verrylvfosnightjr.slickpic.com/albums/25-How-We-Operate-Fall-2022/photo/#19473806
Sample Markup Sheet CONDENSED
A sample markup sheet for jobs on the layout. This is how to RSVP and save a job all in one step by you. 1. Verryl sends out an INVITATION through the email group "
[email protected]
" 10 days - to 2 weeks before the session (which is usually the 2nd Sat of each month unless that is too close to Mother's, Father's or other holidays. 2. YOU go to the LINK in the invitation for this Google Sheet. Google has seen to it that nearly everyone has access--if you don't join the email Group.io and read how. 3. You type your name over one of the "Add one name here" AND HIT THE [RETURN] KEY TO SAVE YOUR NAME TO THE SHEET. That's all there is to it! It is a first come-first served deal, so markup early. All jobs except 2 3, 4, and 5 take less than 2 -4 hours, as noted, so you can work another job 6 - 17 or 1 when you are done with the one you signed up for. Email me at
[email protected]
to get on the Groups.io list, or for help/questions about Google Sheets--It is really harmless if you sign up as a personal user--as a business I'll bet you'll get a lot of emails offering ads etc. None of us have found it intrusive--most of us got on right away--we did not even know we were registered with Google.
24 Post Pandemic August 2022
03 Phase III Construction
04 Phase IV All Track Done--Details
05 Structures
06 Wyoming Division Operation Sessions
07 Fall Invitational Nov 12-14, 2016
08 First Annual Winter Invitational
09 Backdrops Signals Scenery
10 Backdrops Signals Scenery
11 2017 Winter Invitational Meet BBQ
12 2017 Winter Invitational Meet Ops
13 Winter Invitational 2017 Lenander Photos
14 2018 Fourth Winter Invitational
16 Spring Invitational (5th) Ops Meet
17 Photographing the WyoDivOps 12/14/19
18 Ops 121419
19 Photos "Lightweight Ops Article"
20 Scenery and Structures June 2020
21 Wyoming Division Scenery
22 ABS Signals
23 Structures During Pandemic
24 Post Pandemic August 2022
25 How We Operate-Fall 2022
Scroll To Top
Slideshow
By Email
Link:
Copy Link
?
Close Sidebar
Verryl V Fosnight Jr
PRO
Follow
Following
Unfollow
Contact
Photo Details
Date
Dimensions
Size
File
Camera
ISO Speed
Exposure
Aperture
Focal Length
Flash
Display Image Quality
Tags
Comments
No comments yet...
All fields are required, fill in the form.
Comment successfully added.
Comment
New comments notifications
Audio Mute
Prev
Play
Next
Shuffle
Include
Privacy and cookie policy
This site uses cookies to enhance your browsing experience, serve personalized content, and analyze traffic. By continuing to use this site you agree to
use of cookies and stewardship of your data
.


![Signs on the Fascia CROPPEDWe have posed many signs on the fascia to help operators 1. know where their train is 2. see where it should go to get to its next destination 3. Where to call the Dispatcher (Ds) and what to tell him. 9Remember you identify your train to him by reporting the 4 things on the top of your TS (Train Sheet) by saying, "This is [Loco number] [train name/type] [From] [To] and [at] (stating your current location. 4. there are track maps of all yards or locations where you might be looking for a car to pull or a spot to leave a car. 5. Yard Limit signs show the boundaries of the YM's authority over you and your train. 6. All of the layout is double tracked except for the Harriman Cutoff , which is bidirectional with a single length of double track for meets., and the OSL which is an 186 foot long track with two sidings. The OSL is hidden track but visible on its straights on the edges of the benches. 7. The current of running changes to left hand running between Dale Junction and Laramie and between the Curvo overpass and Ogden. Engineers watching for fascia signs will see this change noted by a tan colored fascia sign that schematically shows this. 8. Each yard has a brief note of yard instructions on blue paper i a sheet protector. 9. Each yard has a skinny 3 ring 8 1/2 x 11 binder with the list of spots, in case the YM to the engineer needs to pick a spot to send a car forward on his own.](https://stored-cf.slickpic.com/Njg0NDdjMzg1ZDUyNw,,/20221122/MTk0NjIyNjRjODUz/pm/600/Signs_on_the_Fascia_CROPPED_v1.jpg)
![Sample Markup Sheet CONDENSEDA sample markup sheet for jobs on the layout. This is how to RSVP and save a job all in one step by you. 1. Verryl sends out an INVITATION through the email group "[email protected]" 10 days - to 2 weeks before the session (which is usually the 2nd Sat of each month unless that is too close to Mother's, Father's or other holidays. 2. YOU go to the LINK in the invitation for this Google Sheet. Google has seen to it that nearly everyone has access--if you don't join the email Group.io and read how. 3. You type your name over one of the "Add one name here" AND HIT THE [RETURN] KEY TO SAVE YOUR NAME TO THE SHEET. That's all there is to it! It is a first come-first served deal, so markup early. All jobs except 2 3, 4, and 5 take less than 2 -4 hours, as noted, so you can work another job 6 - 17 or 1 when you are done with the one you signed up for. Email me at [email protected] to get on the Groups.io list, or for help/questions about Google Sheets--It is really harmless if you sign up as a personal user--as a business I'll bet you'll get a lot of emails offering ads etc. None of us have found it intrusive--most of us got on right away--we did not even know we were registered with Google.](https://stored-cf.slickpic.com/Njg0NDdjMzg1ZDUyNw,,/20221125/MTk0NzM4MDY1MzI1/pm/600/Sample_Markup_Sheet_CONDENSED.jpg)
No comments yet...
All fields are required, fill in the form.
Comment successfully added.
Comment