
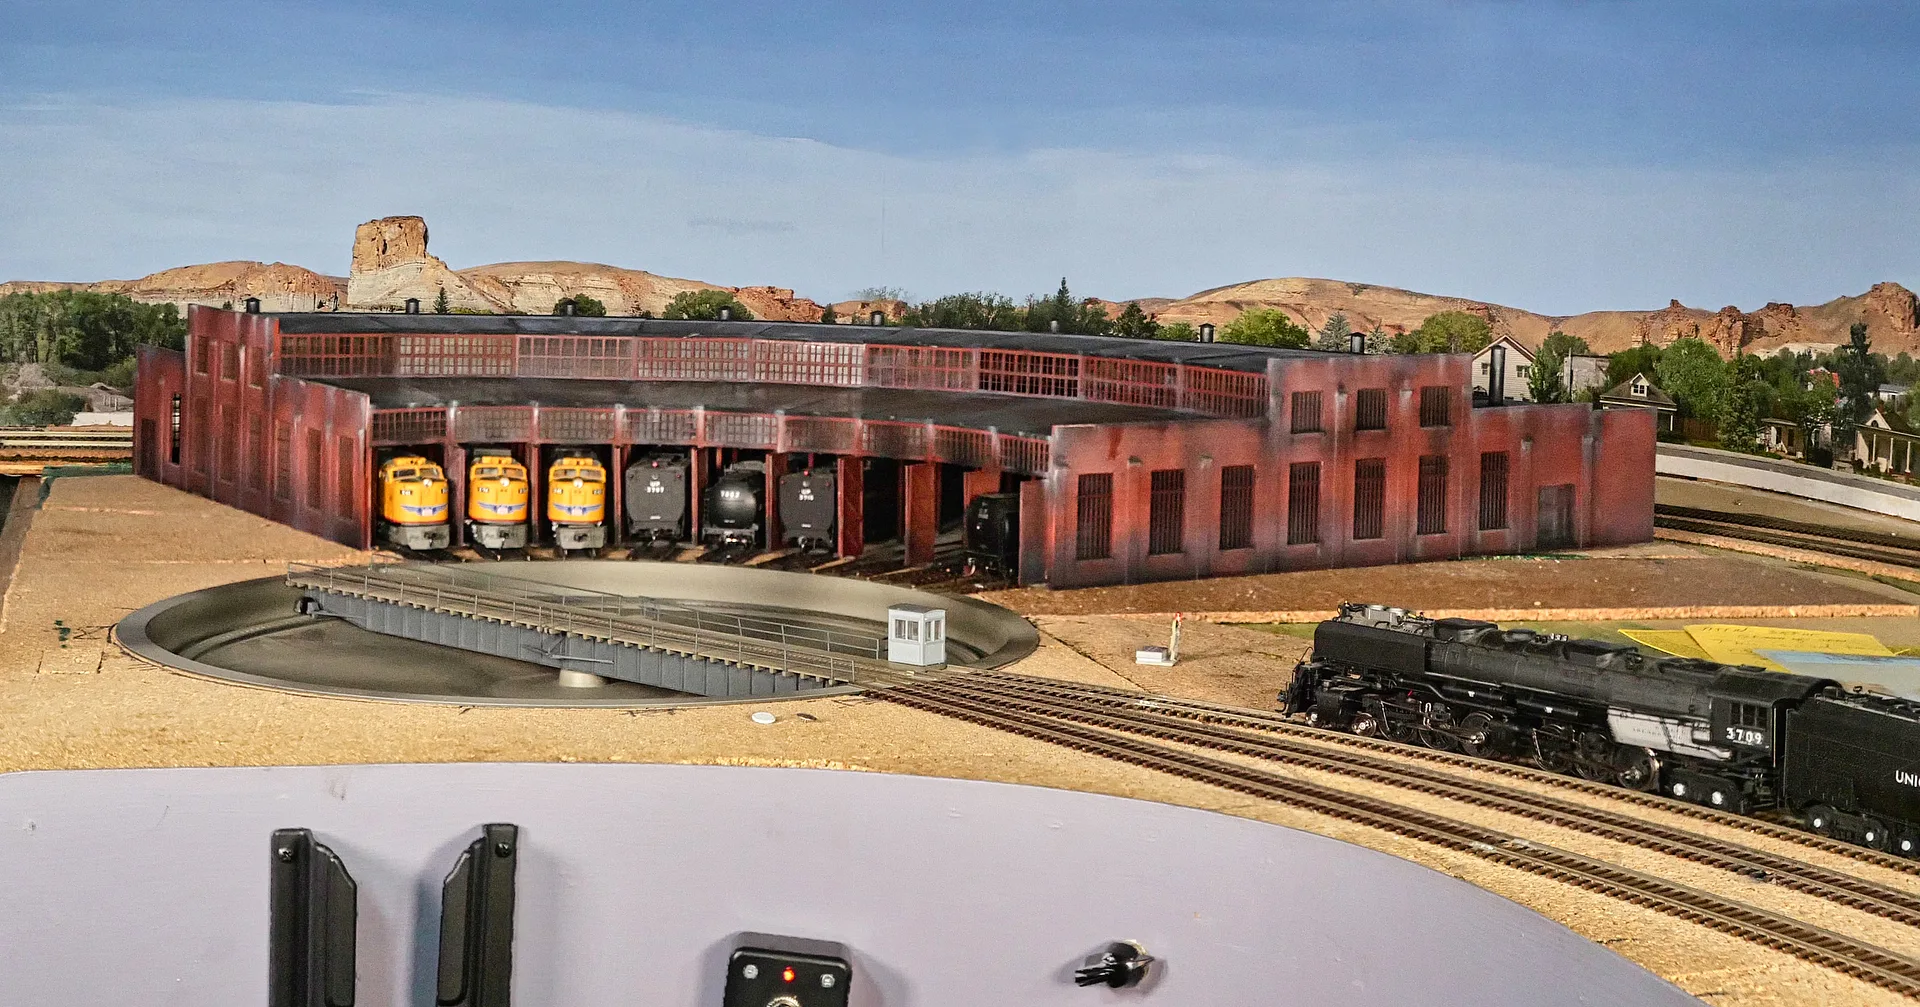

P1000885 Per sht 3 LOOK TRNP
Leaving Cheyenne westbound past Tower A, the interlocking tower where originally turnouts were controlled with manually activated levels. This was a brass model that Lenny painted and detailed inside including lights. The two storage shacks nearby are seen on p. 106 of Robert Darwin's classic book"The History of the Union Pacific Railroad in Cheyenne." Lenny drew them n AutoCAD and 3D printed them out.
I put up the turnout number posts to identify the 66 turnouts with Tortoise machines electrical switches on the panels along the south side (geographically speaking) of the Cheyenne steam yard bench. The Tortoises were necessary for all the turnouts which were too far inboard to reach on that 84 inch wide bench. See next photo.
Capture Date: Oct 15, 2020 11:15 AM•Views: 104
No comments yet. All fields are required, fill in the form. Comment successfully added. Comment
|
22 Descript 042015 16 PPsht
Our model of the Cheyenne yard has all the tracks except 2 storage tracks and 3 freight house tracks! The 18x24" hanging map has all 69 of the Tortoise turnouts numbered left to right on the map, and these correlate with the numbered electrical rocker switches set inside 1" holes on the 12 panels across the bench fascia. After an engineer determines his route in or out of the yard, he can set the turnouts accordingly. The turnouts on the bench are labeled with 3/16" square Plastrut poles about 1 1/4" tall. This photo was taken early in the installation, so only a few of the white numbered poles can be seen to the left. These layout posts can be seen better on the previous photo, which was taken after all the posts were installed. The description of the turnout numbering is continued on next photo.
Capture Date: Apr 20, 2015 11:17 AM•Views: 107
No comments yet. All fields are required, fill in the form. Comment successfully added. Comment
|
22 Descriptive Photos 10 PP sht
Here is a closeup of one of the 12 Cheyenne steam yard panels. This photo was taken with the DCC track power on, so the LEDs are on to mark the direction each turnout is set. This photo was taken before the electrical switches and turnouts on the map were numbered; it is shown here solely to illustrate the lighted LEDs. The map/electrical switch number scan be seen on the panels on the last photo.
In addition to the 11 switch panel for the Cheyenne steam yard, there are 3 more in staging, and one at the Granite Quarry and one at Dale Junction.Tortoise turnout controls were used in these locations, because the turnouts are hard or impossible to reach from the aisles.
Capture Date: Oct 9, 2014 01:04 PM•Views: 101
No comments yet. All fields are required, fill in the form. Comment successfully added. Comment
|
P1000889 Sht 3 TRNP Look
This is a closer look at Tower A, the interlocking switch building at the west end of the Cheyenne steam yard. Tower operators inside it controlled the turnouts on the four tracks west out of Cheyenne (to the left). The two line sheds on either side of it can be seen on page 106 of the giant Robert Darwin book, "The History of the Union Pacific Railroad in Cheyenne."
Capture Date: Oct 15, 2020 11:25 AM•Views: 100
No comments yet. All fields are required, fill in the form. Comment successfully added. Comment
|
P1000904 Look TRNP Sheet 3
Lenny painted and detailed our brass model of Tower A near the east yard limits of Cheyenne. He added many interior details and lights. The line shacks are seen in photos from our 1957 era.
Capture Date: Oct 15, 2020 11:54 AM•Views: 103
No comments yet. All fields are required, fill in the form. Comment successfully added. Comment
|
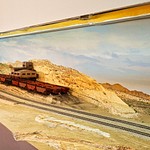
P1001010 PP sht Crop top
Upper (western 2/3) of Harriman Cutoff with Tracks #1 and #2 against the backdrop. The old Sherman Station is to the left. The signals on the Cutoff show yellow for the through, or right hand track for this portion of the bidirectional double track main, and the lower signal head shows red for the non preferred left had track. These signals are set to match the turnout setting which is manually set by the engineers, who are always proscribed to take the right hand track in either direction, up or down the Hill.
The signal bridge over tracks #1 and #2 can be seen against the backdrop at about the photo level of the coal tower. The yellow signal aspect over #2 can just barely be seen. This ABS signal is normally yellow because the signal for the second ABS block ahead is normally red. It is one of our "mother-may-I" signals that are manually turned from red to yellow to give signal permission to enter the Cheyenne yard by the YM there.
Capture Date: Jan 7, 2021 10:54 AM•Views: 129
No comments yet. All fields are required, fill in the form. Comment successfully added. Comment
|
P1001019 PP shtCrop
Harriman Cutoff (Track #3) viewed from over Dale. The ABS signal for this section of bidirectional track shows yellow for the upper signal head, indicating that the main route down the Hill (the right hand track of the one ABS block of the Cutoff), is clear and available to traffic. The green is not used here; there is a speed restriction for this double track portion of the Cutoff. The lower head shows red, because the turnout is set against it.
Actually, the prototype has a siding here, but also it has CTC, so traffic is controlled by a remote CTC operator, but I did not want to have a separate operator devoted to a CTC machine, so we made this part double track.
This is an in-camera focus stacked image from a 1 second video of about 30 frames, and I shot it hand held (no tripod). I imagine I moved the camera a bit during the 1 second video exposure, and the camera assembled the multiple images of the stair railing together the best it could to made the composite image with some vertical bars offset.
Capture Date: Jan 7, 2021 11:10 AM•Views: 135
No comments yet. All fields are required, fill in the form. Comment successfully added. Comment
Verryl V Fosnight Jr Feb 21, 2021 08:56 AM
Read all 2 comments →
You are right, Dennis. I was thinking the second "block" ahead was Cheyenne, which has a "mother-may-I" normally red, which would cause a yellow. Cheyenne is the third "block" ahead. |
P1000821 PP
Scenery and backdrop just to the east of Dale Junction.The near track is the Harriman Cutoff, track #3, approaching the two mains, Tracks #1 and #2.
Capture Date: Sep 10, 2020 10:25 AM•Views: 98
No comments yet. All fields are required, fill in the form. Comment successfully added. Comment
|
P1000823 PP C&S sky
The Harriman Cutoff, Track #3, is nearly to the turnout of Dale. Westbound trains coming up #3 from the right merge with the left hand track, #2, and continue on down the Hill to Laramie on it, Traffic arriving from Cheyenne from the left is running right handed, and must cross over a crossover from #1 to #2 to run left handed down to Laramie.
Trains coming up from Laramie similarly must switch from the left hand track #1 to #2 (middle track here) to return to right handed running on down to Cheyenne.
The low poles are power poles to the turnouts and signals. The tall poles are regular public power polls.
Capture Date: Sep 10, 2020 10:26 AM•Views: 99
No comments yet. All fields are required, fill in the form. Comment successfully added. Comment
|
P1000827 PP Adv SR_BS3
A view of Dale Junction from the west (Laramie) side. The 5 head signal on a single mast is for all traffic coming up from Laramie on the left hand track.
Left hand three heads: Top: signals the near crossover (possible route to revert to right hand running. Middle head: Signals the second crossover: second route to right hand running down #2. Bottom head: Route not allowed, so signal is always red.
Right hand pair of heads: Top head: second turnout of the first crossover. Bottom head: turnover for either route, 1) straight onto #2 right handed down to Cheyenne, or 2) diverted to right onto Harriman, #3, down to Cheyenne or past Cheyenne on Speer Wye to Denver (staging).
Far triple head signal: similar for 3 crossovers available for a train from Cheyenne across Dale to Laramie.
Double head signal (through water tower legs): Top: Turnout to #2 down, Lower: crossover to #1--NOT allowed, always red.
Capture Date: Sep 10, 2020 10:34 AM•Views: 99
No comments yet. All fields are required, fill in the form. Comment successfully added. Comment
|
P1000839 Foc Stk Look PP
View of Dale from higher elevation: better view of the3 signal masts and the 3 crossovers plus one turnout to Harriman Cutoff, #3.
The coal tower at the upper right corner is at Harriman, Wyoming.
The white buildings in the very far upper right are Wycon Chemical that produced fertilizer from the trona (soda) mined in south central Wyoming.
Capture Date: Sep 10, 2020 10:47 AM•Views: 103
No comments yet. All fields are required, fill in the form. Comment successfully added. Comment
|
P1000870Crop&Rot per Sht 2
The signal bridge on the east side of Laramie across from the Laramie tie treating plant. The plant is narrow gauge, and stacks of treated ties and poles are visible. Flat cars await loads of treated goods out. The grey building is the 3-retort building, the engine house is the brown building, and behind it are fuel and creosote tanks.
The signal bridge has a yellow and a red aspect over the left had track. The left hand running down from Sherman Hill (and up it) ends at the double crossover, which is not prototypical. I bought it several years before starting the layout, and paid $55 for it, and darned if I was going to waste it.
Across the aisle is the west side of Cheyenne with a few industries to switch.
Capture Date: Sep 24, 2020 12:31 PM•Views: 101
No comments yet. All fields are required, fill in the form. Comment successfully added. Comment
|
P1000873 C&R per sht 2
The Laramie Tie Treating plant from the west side, and the view up the west slope of Sherman Hill. Tracks1 and #2 are widely separated up this slope; the newer #2 took a longer route down the Laramie range of mountains making it a gentler grade. Hence in 1905 the new #2 on the left became the up grade track, and the old #1 the down.
The other main buildings of the Tie Treating Plant are shown in this view, The fire house with glass windowed offices on the second floor, and beyond that the lumber mill and burner with untreated ties and poles yet to be creosoted.
The beginning of the Laramie yard can be seen on the next bench to the lllllllleft, and across that aisle can be seen parts of Hanna, a coal mining region. We have modeled 3 of the many mines at the real Hanna.
Capture Date: Sep 24, 2020 12:35 PM•Views: 98
No comments yet. All fields are required, fill in the form. Comment successfully added. Comment
|
P1000887 PP sht47
These are the ABS signals at the west Laramie yard limits. The green is the beginning of another series of ABS blocks. The green indicates that both blocks ahead are unoccupied.
The ABS west bound faces the other direction, naturally, and it is one of the normally red "mother-may-I" signals controlled by the Laramie YM to meter the eastbound traffic into his yard from the west. Here we used a two aspect signal, since green is never used too enter these busy and crowded yards at high speed.
The next photo shows the signal bridge over both mains at the east Laramie yard limits. These are also normally red "mother-may-I" signals controlled by the Laramie YM.
Capture Date: Oct 15, 2020 11:22 AM•Views: 94
No comments yet. All fields are required, fill in the form. Comment successfully added. Comment
|
P1000893 Sht 3 LookTRNP
This is the two aspect yellow over red signal at the west Laramie yard limit. The white yard limit sign is on the fascia. This is another of the "mother-may-I" signals like at all the four main yards (Cheyenne, Laramie, Green River, and Ogden.
Capture Date: Oct 15, 2020 11:32 AM•Views: 92
No comments yet. All fields are required, fill in the form. Comment successfully added. Comment
|


No comments yet...
All fields are required, fill in the form.
Comment successfully added.
Comment